Thursday, August 27, 2009

KT


So here she is, my #1 child, my first born, my girl; KT. KT is a beautiful, 13 year old, young lady who has more talents than any one person should. She is so creative and is always working on a project. I must say she has been a little jealous since I did the post on her brothers. But, in my defense, I did ask her to submit something for me to write about and she found nothing worthy. That was until I woke up* the other morning to this...

Isn't it beautiful? I want one! But more than loving the necklace, I love that she has an idea and just whips it out. Here it is with the matching earrings...

KT has been designing and making jewelry since she was 8. I have always been impressed by her creations.

This is the first necklace she made 5 years ago.

See what I mean. Pretty sophisticated for an 8 year old. Not the usual gaudy, color combinations. Do I sound like a proud Mama? I am. My girl and I are great friends and I love who she is. I especially love her fast emerging sense of style and taste. Though I can't say we always agree (she told me last night, to my horror, she doesn't like Joni Mitchell!!!!), I have great respect of her opinion, (except that last one... she'll grow out of it).

Sometimes I look at her and wonder where these gifts will take her. Her talents are endless and she has such strength. I guess I'll just have to wait and see. Until then I'm just enjoying the ride. Such an adventure, this parenting gig.

*When I say I "woke up to it", I mean it in the most literal sense, i.e. it dangling two inches from my closed, sleeping eyes.

Crazy for Blackboards


What to do with a long, boring wall? Paint it with chalkboard paint! I've been wanting to do this for awhile for a few reasons:

1. The bottom of this wall gets very dinged up and dingy
from kicked off shoes since it's right by our back door.

2. I wanted to give our 14-month old something to do in
our kitchen, especially while I do laundry, which is
right around the corner from this wall.

3. My husband and I are trying to stick to a weekly
grocery budget and that means writing down what
spend.

4. The size of this wall just called out to be a blackboard!

The wall was very easy to paint--no primer needed. We just added the trim and corner pieces with liquid nail to give it that framed look. You can even buy tintable chalkboard paint if you want, say, a green or even purple board. So fun!


I'm a little crazy for chalkboards now (and I have some paint left). Check out more project ideas, including how to dress up an ordinary eraser for your new blackboard at Country Living (click on the picture for a direct link):

Wednesday, August 26, 2009

Toddler Art

Sorry we haven't had any crafty posts lately. I'm preparing to go back to teaching writing at our local University this week and have been swamped. At least one of us has found time for crafts around here. I am trying to have "art time" every day with our 14-month old. This day, I was brave and gave him paint and just steped back. You can see how much fun he had:


I've also given him watercolors, stickers, and little, round stampers he can hold in his hand.


Sometimes art doesn't go so smoothly. Here, Ari DID NOT want to paint on the scrap of cardboard I gave him.


So he got rid of the cardboard and Ari was perfectly happy painting his highchair. Everything is washable, right?!


My mom made this cute little "art book" using a pop tart box, double-sided tape and heavy card stock. She bound it herself, but you can also recycle your packaged food containers and then have the notebook bound at a copy store. Ari can't wait to fill it with all kinds of doodles.

Monday, August 17, 2009

Baby proofing with fabric

Does anyone still have one of these? It's called a stereo and it's perfect for little hands that want to turn dials, grab cords, and put things in slots. It's almost as tempting as the TV, which we put in this cabinet (below) I found at a used furniture store when our son was first pulling himself up.
But what to do with a stereo besides throw a blanket over it? We've been doing that for awhile, but I just don't like how messy it looks. So, I had to do it...I made another furniture cozy. I know, this is getting ridiculous. My husband says I'm going to just drape this whole house in fabric one of these days in order to baby-proof it, but I promise, this is the last one.
Isn't it so cute? I used a good, upholstery-weight fabric that I got on clearance and added the fringe to make it look like a little ottoman. I thought the fringe would be hard to sew on, but it was very easy. The hard part was cutting out the pieces from yards of fabric that swallowed up my dining room table for many days. I just didn't even know where to begin.


I finally began how I always do: I take a scrap of paper from the recycling bin, usually an envelop, pour myself a cup of coffee, and draw out what I envision. In this case, I measured the stereo and drew the number of panels I'd need.

The main difference between this stereo cozy and the toy shelf cozy I made for my son's room is that I made the back panel short so that we could access the cords (to plug in the iPod--we're not that behind the times!). I also cut an extra carpet square made by FLOR that we had to give the top some structure since the top stereo component is smaller than the bottom one. You could also use a piece of foam, Styrofoam, or even just cardboard from a recycled box.

So there you have it--a baby-proofing solution that doesn't require a plastic gate that, in my opinion, just screams "Get past me. I dare you!" instead of "Not for babies please."

We'd love to hear about your non-conventional baby-proofing solutions.

Creating

I live in a house full of artist. It is a dream come true that my children love to create as much, if not more, than I do. My eldest son asked me if he would be as good an artist as I am when he is my age. How sweet! I had to tell him that he already blows me out of the water.

This next one is by my second son, who could walk/run at 8 months, but whose fine motor skills took their time in developing.
I think they've more than caught up.

A few weeks ago, I thought I'd try out an idea I saw in The Creative Family by SouleMama Amanda Blake Soule. She transfers her children's drawings onto fabric and has the child embroider on the lines. She then makes a pillow out of it. Like so...
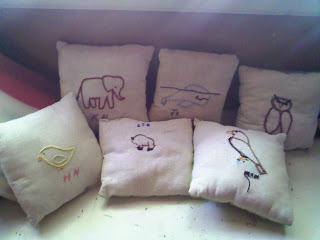
Such a fun and successful project! Not to mention providing hours of work for busy little hands. These pictures are very simple. Now that we know what we are doing, I think we will try slightly more complicated pictures the next time. I really love these pillows and am pretty sure they are going on our "Christmas gifts for others" list. Which btw, is around the corner! This handmade pledge is adding a new dimension of stress to the holidays. But I am excited and up for the challenge. At least today.

Tuesday, August 11, 2009

15 minute bread bag and almost as easy roll recipe!

I'm so sick of ziplock bags: paying for them, washing them out, drying them all over the kitchen. To ease up on our use, I made this easy bread bag using a vintage tea towel, a scrap of fabric from my kitchen curtain project, and some velcro. Don't look too close--this project was also intended to make me practice turning and stitching around a small area. Let's just say the stitching around the velcro would not pass the 90 degree rectangle test. Oh well. The rolls I made today don't mind.
If you've never made rolls before, try this easy recipe. It literally takes a few minutes to throw together, then some patience to let them rise before baking for 15 minutes. Today, I sewed the bread bag while the rolls were rising. It came together so fast, my husband and I decided to take the baby to the swimming pool for a last chance swim before the pool closes. I checked with my mom who assured me I could throw the dough into the fridge for a slow rise while I was gone, then just take it out and let it come to room temp. when we got home. They came out fine and the pool was worth it.

I loved making these this past winter when my son was 5-6 months old. I'd wear him to sleep in a sling while I made up the dough, then I'd put him and the dough in his space-heater warmed room. He only ever slept for 45 minutes to an hour--the exact time the dough needed! I'd put him back in the sling while I rolled the dough into balls for the second rise. This is pretty much the only domestic skill I really got a handle on when my baby was small. Somehow, that sling and laundry just didn't get along.


Mom's Favorite Rolls

½ cup milk

6 T unsalted butter

Warm water

½ cup sugar

1 egg

1 tsp. salt

2 T. yeast

5 – 5 ½ cups bread flour


  1. Place milk and 4 T butter in a 2-cup measuring cup. Microwave on HIGH for 1 ½ minutes or until butter is melted. Add enough warm water to measure 2 cups.
  2. Combine sugar, egg and salt in large mixer bowl; mix well. Add milk mixture; mix well. Add yeast, one tablespoon at a time while mixer is running. Turn mixer off and let stand 2 minutes.
  3. Add 3 cups flour. Beat at medium speed, scraping bowl often, until smooth and elastic (2-3 mins.) Change from paddle to dough hook and add enough remaining flour to make dough easy to handle.
  4. Place 1 T butter in a large bowl and microwave for 40 seconds on HIGH. Set aside. Turn dough out onto a floured board and knead until smooth. Place dough in the bowl, then, turn it over so the “buttered” side is up. Place plastic wrap across the top and let rise about 40-45 minutes.
  5. Punch down dough; divide in half. Divide each half into six buns. Grease a 10 X 15-inch jelly-roll pan with melted butter. Place buns on baking sheet and brush tops with more melted butter. Cover with plastic wrap and let rise, about 40 minutes.
  6. Preheat over to 375-degrees. Bake buns 15 minutes on until golden brown (Note: I used a mix of white and wheat flour which is why my rolls above may look darker than how yours turn out).
Always follow mom's directions.
Happy Baking!

Wednesday, August 5, 2009

Easy toy bag for the car.


When the back seat of our car started looking something like this...


I decided to make this:

{Bonus: any craft that requires swinging a hammer really hard is worth trying}.
This is a quick and easy toy bag that I made from a pillow sham that came as a set with a comforter we registered for when we got married. I don't know what we were thinking--we don't have a guest room and rarely use this comforter, let alone pillow shams. I originally thought I'd just fold the bottom of the sham up about 3/4 of the way and sew it up the sides to make 3 pockets. Then I'd add grommets and some kind or rope or ribbon to secure it to the back of the front seat in our car.

My husband warned me the toy bag would be too wide, but I didn't listen.He was right. After fussing with a floppy bag that toys just fell right out of, I decided to cut the slightly altered sham in half:
All I had to do was fold the newly cut side in about 1/4 of an inch and iron it, then sew it back up.
I then had to get out my most useful and most often used sewing tool, the seam ripper:If you are a beginner sewer and you don't have one of these, get one. I am quite good at ripping seams gone wrong out and the whole process feels productive for some reason--I think because it still feels like I'm sewing, even when I'm un-sewing. Anyway, I ripped out the existing seam that gave the original sham a wide, decorative edge in order to make my 1/2 of a toy bag wide enough to hold something. I decided to sew a ribbon (that probably wrapped up this wedding gift in the first place) down the left side of the bag to cover up the ripped out seam. Finally, I secured the bag to the neck rest of the front seat by looping nylon rope through grommets that I had a lot of fun hammering in. I need to burn the ends of the rope to keep it from fraying more, but the baby is always with me when I go to the car and burning something next to him doesn't sound like a good idea. I'll just have to wait on that step.

In the meantime, the new bag isn't perfect, but it was basically free to make and it's helped the clutter. It holds a few books in the front pocket and a few small toys in the larger pocket. I have another sham and I think I could improve on this design. I'll share it with you depending. If it really does turn out better, my sister just may get one in the mail.

Don't feel like sewing up a perfectly good pillow sham? Check out this way cute organizer from SewnNatural on Etsy. (She's a slightly better sewer than I am):


Saturday, August 1, 2009

Remaining Faithful

So, you may or may not have noticed, that Kelly and I have taken the Handmade Pledge. Which means that we have decided to attempt to not purchase anything that is not handmade or to make things ourselves. Seems easy enough. But when my I was invited to my friends baby shower, I was at a loss for how to live out this vow. You see I have a problem. When ever I have a gift to give, it has to be very personal, both for me and for the receiver. This is great when it all comes together. But the process of figuring it all out can be overwhelming and this time I nearly headed down to my local "have it all mart" to ease my indecisive mind. Especially, for this friend, who is a professional artist, the pressure was on.
I am so glad that I didn't cave! I had the best time making these little treasures. I did freezer paper stenciling on plain white onesies, made relaxing spa type goodies for momma and baby and "wrapped" it all in a box I bought for 50% off at my local art store that I brought home and painted. Upon completion I had an awesome gift for a great woman that I was excited to give.
As the Marines say, "Semper Fi"!